
UK homeowners: Read plasticity and sulphate tests before extension
UK homeowners: when a soil test for an extension matters, and how lab results change foundation design, cost and timing.

UK homeowners: Read plasticity and sulphate tests before extension
Yes, in most cases you need some form of ground investigation before your extension gets built, though the scope depends entirely on your site. If your garden has clay soil, mature trees nearby, made ground, or any unknown fill history, commission a Phase 1 desk study now and get a structural engineer to scope trial pits. Skip this step and you risk a foundation design that either fails or costs far more than it should.
TL;DR:
- Soil investigations are crucial for sites with clay soil, mature trees, made ground, or unknown fill history to prevent foundation issues and avoid costly redesigns.
- A ground investigation includes a desk study, trial pits, boreholes, and laboratory tests such as Atterberg limits, sulphate, and particle size, which directly influence foundation design.
- Knowing site-specific risks like trees, shrinkable clay, or contaminated fill determines whether intrusive testing is necessary, saving money if minimal testing suffices.
- Results from geotechnical tests inform foundation type and depth, with high plasticity or poor bearing capacity often requiring deeper, reinforced, or piled foundations.
- Early coordination of soil testing, foundation design, and Building Control in a single managed process reduces delays and ensures design accuracy tailored to actual ground conditions.
Table of Contents
- What does a soil test for extension work actually involve.
- What do the key laboratory tests actually tell your engineer?
- When do you definitely need a full site investigation?
- How do soil results change your foundation design and paperwork?
- What does a soil test for extension actually cost, and how long does it take?
- What makes a ground investigation report trustworthy?
- Why timing your investigation early avoids redesign headaches
- Is a soil test worth the cost before you commit to a design?
- How The Extension Works coordinates your soil test and build
- Where to check the standards and guidance yourself
- Sources
- FAQ
What does a soil test for extension work actually involve.
A proper ground investigation happens in stages, and most homeowners only ever hear about the last one: someone digging a hole in the garden. That’s the visible bit. The groundwork happens earlier and matters just as much.
1. The Phase 1 desk study comes first. This is a paper exercise, not a dig. A geotechnical consultant reviews historic Ordnance Survey maps, British Geological Survey drift maps, mining records, and flood data to work out what’s likely under your garden before anyone breaks ground. A desk study identifies legacy risks such as old mining shafts, backfilled ponds, or industrial contamination, and it makes any intrusive work that follows far more targeted and cost-effective.
2. Intrusive investigation follows if the desk study flags anything, or if your engineer wants to ground truth regardless. Three methods dominate domestic work:
- Trial pits: a mini digger excavates to around 1 to 3 metres so an engineer can see and log the soil layers directly, ideal for shallow strip or trench-fill foundations.
- Window sampling: a small rig pushes a narrow tube into the ground to recover a continuous soil core with minimal disturbance to the garden.
- Boreholes: used when foundations need to go deeper, typically past 3 to 5 metres, or where groundwater levels need checking.
3. Interpretation and sign-off. Raw samples on their own tell you nothing. A qualified site investigator or chartered geotechnical engineer logs the strata, sends samples to a laboratory, then a structural engineer translates the lab data into a foundation design. This is also the point where the engineer decides whether your extension needs a simple strip footing or something more involved, such as piling. Bringing the engineer in at the scoping stage, rather than after the pits are dug, avoids paying for tests you didn’t need and catching ones you did too late.
What do the key laboratory tests actually tell your engineer?
Three lab results do almost all the heavy lifting in a domestic ground investigation, and each one answers a different design question.
Atterberg limits and the plasticity index. This test measures how a clay soil behaves as its moisture content changes, specifically the point where it shifts from solid to plastic to liquid. The plasticity index that comes out of this test fixes the soil’s shrink/swell classification, which is the single biggest factor in how deep your foundation needs to go. A soil with a high plasticity index shrinks and swells dramatically with the seasons, and if your foundation doesn’t sit below that active zone, you get differential movement, which shows up as cracking.
Statistic callout: On highly plastic clay sited near mature trees, engineers commonly push trench-fill depth well beyond the standard 900mm, sometimes specifying compressible board against the trench wall to absorb future heave.
Sulphate and pH testing. Where your site has made ground, backfill, or any brownfield history, the lab checks the soil’s chemical aggressiveness. High sulphate content attacks ordinary concrete over time, so this result determines the concrete design mix and the “AC” class your foundations need, following the BRE’s SD1 guidance. Get this wrong and you might be pouring concrete that starts degrading within a decade.
Particle size distribution. This test tells you whether you’re dealing with granular soil (sand, gravel) or cohesive soil (silt, clay), and it drives the bearing capacity calculation your engineer uses to size the foundation.
- Sandy or gravelly ground generally offers higher bearing capacity and drains well, often allowing shallower, simpler footings.
- Soft clay or silt has lower bearing capacity and can be compressible, sometimes pushing the design towards a wider strip footing or a raft.
- Mixed or layered ground, common on older suburban plots, may need different foundation depths across a single extension footprint.
None of these tests are academic exercises. Each one feeds a specific line in your structural engineer’s calculations, and skipping one because it “seems unnecessary” tends to be the decision that comes back to bite homeowners at the excavation stage, when Building Control asks for evidence the engineer never had.
When do you definitely need a full site investigation?
Some sites can get away with a desk study alone. Others genuinely can’t skip intrusive testing, and knowing which category you’re in before you commit to a design saves both money and time.
- Trees within influencing distance. Mature trees, particularly water-hungry species like oak, willow, and poplar, dry out clay soil around their roots, and NHBC guidance requires foundation depth calculations that account for this influence zone, even after a tree has been removed.
- Shrinkable clay soils. Large parts of the UK sit on clay with meaningful shrink/swell potential, and this is one of the most common reasons subsidence claims get made against extensions built without proper investigation.
- Made ground or unknown fill. Former gardens, allotments, or plots with a history of filling, dumping, or landscaping often hide inconsistent material that behaves unpredictably under load.
- Former industrial, agricultural, or mining land. Old mine workings, quarries, or contaminated land change both the geotechnical and chemical picture, and a desk study is the only way to flag this before you dig.
- Existing drains and services near the build line. Foundations often need to step down or be redesigned where they cross close to drainage runs, and this needs surveying before excavation starts.
- A junction with an existing foundation at a different depth. Extensions frequently need a stepped or underpinned transition where the new footing meets the old one, and getting this wrong risks damaging the original structure.
Pro Tip: If your desk study comes back clean, with no history of trees, made ground, or nearby mining, and your engineer is comfortable with a visual trial pit inspection alone, you may not need full laboratory testing. Ask your engineer directly whether the site risk justifies the extra spend before you book anything.
How do soil results change your foundation design and paperwork?
Test results don’t just sit in a filing cabinet. They translate directly into decisions your structural engineer makes, and those decisions are exactly what Building Control checks before signing anything off.
1. Deeper trench-fill for shrinkable clay. Where the plasticity index shows high shrink/swell potential, particularly near trees, the engineer typically specifies deeper trench-fill foundations than the nominal minimum, sometimes with heave precaution measures built into the design.
2. A raft foundation for soft or variable ground. If particle size and bearing capacity tests show weak or inconsistent soil across the footprint, a raft foundation, which spreads the load over a wide concrete slab, often replaces a conventional strip footing.
3. Piled foundations for genuinely difficult ground. On sites with deep made ground, very soft clay, or unusually low bearing capacity at accessible depth, piling transfers the load down to a more competent stratum rather than trying to found on the poor material near the surface.
Once the engineer has processed the lab results, they produce a package that includes the safe bearing pressure for your site, specific foundation depths for each part of the extension, and calculation notes showing how they arrived at those figures. This is the document Building Control actually wants to see, not just a verbal assurance that “the ground’s fine.”
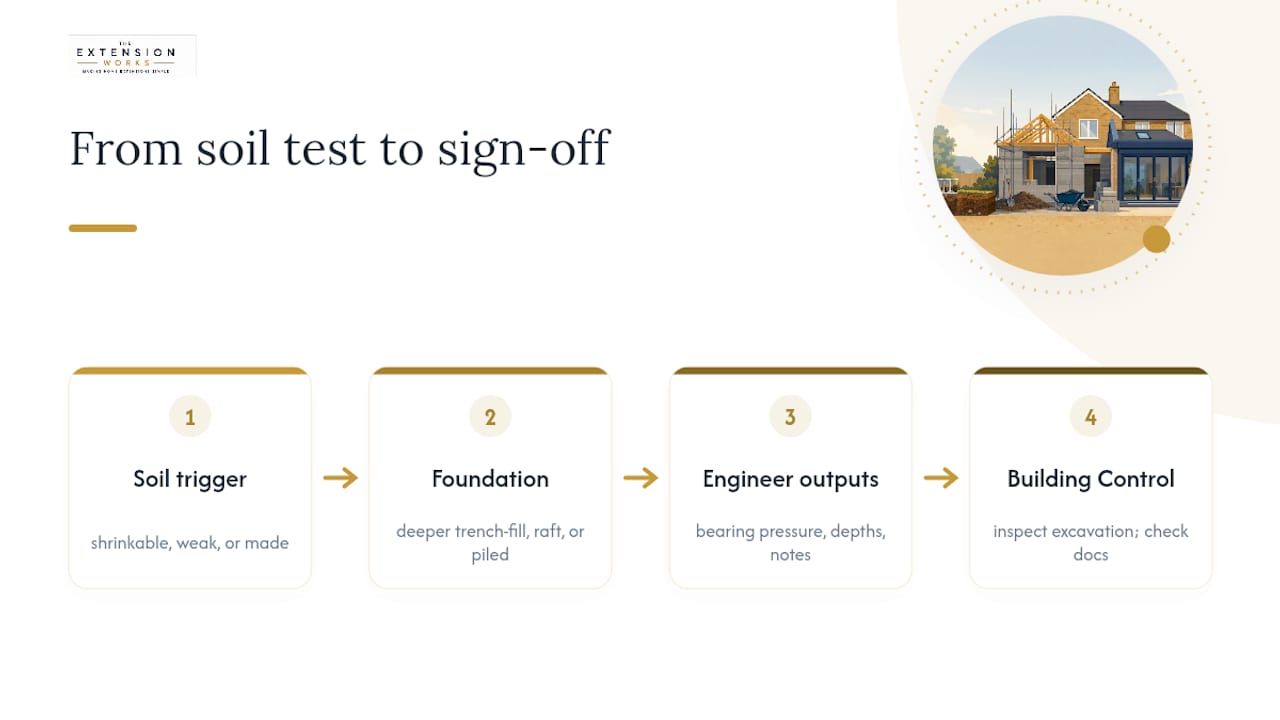
Building Control will typically expect to inspect the foundation excavation before concrete is poured, checking that the depth and bearing conditions match what the engineer specified on paper. They’ll also want the geotechnical report itself, along with UKAS-accredited lab certificates for any chemical or plasticity testing, filed alongside the structural calculations for your extension. Without this evidence trail, expect delays, or a request to open the trench back up for inspection after the fact, which nobody wants once concrete has already gone in.
What does a soil test for extension actually cost, and how long does it take?
Costs vary a fair amount depending on site complexity, but the ranges are predictable enough to budget against.
A Phase 1 desk study alone is the cheapest option and the sensible starting point for almost every extension project, since it tells you whether intrusive work is even necessary. A single trial pit programme, typically two to four pits dug and logged by a site investigator, costs more but remains modest compared with the extension budget as a whole. A small borehole programme costs more again, reflecting the specialist rig and longer time on site. Per-sample laboratory testing, covering plasticity index, sulphate, and pH, is charged individually, so the more samples your engineer wants analysed, the higher the lab bill climbs.
Statistic callout: Comprehensive intrusive programmes on complex sites can include multiple trial pits, in-situ testing, and full UKAS chemical suites, alongside groundwater monitoring rounds where contamination or high water tables are a concern, pushing costs well beyond a simple domestic trial pit visit.
Turnaround matters as much as price for anyone trying to hold a build programme together. Laboratory results for standard geotechnical tests generally take a week or two to come back once samples reach the lab. Add site scheduling, report writing, and engineer review on top, and the realistic window from instructing an investigation to holding an interpretative report in your hand is typically several weeks, not days.
Several variables push costs up:
- Poor site access, which can mean hand-digging pits rather than using machinery.
- The number and depth of samples your engineer decides the site warrants.
- Extra chemical testing where contamination or made ground is suspected.
- Specialist in-situ testing, such as standard penetration tests, on trickier ground.
Building this into your project timeline early, rather than treating it as an afterthought once planning permission is granted, avoids a nasty surprise when your builder is ready to start and the foundation design still isn’t finalised.
What makes a ground investigation report trustworthy?
Not every geotechnical report is worth the paper it’s printed on, and Building Control officers and warranty providers have seen plenty of thin ones. Knowing what a proper report contains helps you judge whether the one you’ve been handed will actually get accepted.
A compliant report should include a clear site plan showing exactly where each trial pit or borehole was located, along with detailed logs recording the soil strata encountered at each point. It needs UKAS-accredited laboratory certificates for every chemical or geotechnical test carried out, not just a summary table with numbers and no supporting paperwork behind them. Most importantly, it needs interpreted recommendations, meaning the report states a safe bearing pressure and specific foundation guidance for your site, rather than simply listing raw data and leaving you to work out what it means.
Look for explicit reference to recognised standards: BS EN 1997 (the Eurocode covering geotechnical design), BS 5930 (the code of practice for site investigations), and BRE SD1 for sulphate and concrete classification. A report produced or checked by someone with recognised competence, whether that’s a chartered geotechnical engineer or a suitably qualified site investigator, should be clearly stated, not implied.
- Vague, generic recommendations that could apply to almost any site are a red flag.
- Missing or incomplete lab certificates, or numbers quoted without any accreditation reference, should make you ask questions before proceeding.
- A report with no named, qualified author or sign-off leaves you with little recourse if something goes wrong later.
UKAS accreditation and explicit standards references materially increase the likelihood that Building Control and warranty providers accept your findings without querying them, which matters when every week of delay costs you money on site.
Why timing your investigation early avoids redesign headaches
Ground investigation done after the design is finalised is one of the most common, and most avoidable, causes of extension delay. If trial pits reveal ground conditions that don’t match what the design assumed, the foundation drawings, and sometimes the structural calculations behind them, have to be reworked from scratch.
Commissioning the investigation early, ideally before your architect finalises drawings, means the foundation depth and type get built into the design from day one rather than bolted on afterwards. A managed service that coordinates this properly typically handles it in a specific sequence:
- Scoping the desk study and any intrusive work alongside the structural engineer from the start, not as a separate, disconnected instruction.
- Feeding lab results directly into the foundation design before drawings are finalised, rather than after.
- Preparing a Building Control-ready submission that already includes the geotechnical evidence, calculation notes, and accredited lab certificates.
A specialist home extension company offers an instant online quote and live 3D modelling as part of its in-house process, alongside fixed VAT-inclusive pricing and a 12-month workmanship warranty, coordinated by one dedicated team from initial sketches through to final sign-off, providing a seamless experience similar to integrated services like ADU construction & home additions from Mr Build Co… For homeowners preferring a single coordinated service instead of managing multiple separate contractors, having one team oversee the entire sequence can reduce potential delays and complexity.
Is a soil test worth the cost before you commit to a design?
A desk study alone is often perfectly acceptable if it comes back clean and your site has no trees, no made ground, and no history that raises flags. Where any of those risk factors exist, though, intrusive testing stops being optional spending and starts being the only way your engineer can put a real number on foundation depth rather than guessing at it.
The upfront cost feels significant when you’re already juggling a design fee and a build budget. But a documented investigation report becomes an asset the moment you come to sell the property, since buyers’ surveyors and mortgage valuers take real comfort from seeing evidence that ground conditions were properly assessed rather than assumed. It can also affect how insurers view future subsidence risk on the property.
My honest view: don’t fix foundation type or depth on a drawing before your structural engineer has seen actual ground data. Everything else in the design can flex around that constraint. Very little flexes well the other way round.
— Esskay
How The Extension Works coordinates your soil test and build
Managing a structural engineer, a geotechnical contractor, and a builder as three separate conversations is where most extension projects lose weeks. This company manages all aspects through one in-house team, so ground investigation, structural calculations, planning, and construction sit under a single point of contact instead of multiple ones.

The process starts with an instant online quote, followed by live 3D modelling so you can see the extension before a single trial pit is dug. Pricing is fixed and VAT-inclusive from the outset, and every project carries a 12-month workmanship warranty once built. Planning permission, including Permitted Development routes, and Building Control submissions are handled in-house, alongside the structural calculations that your ground investigation results feed directly into.
Complex sites, such as those with deep made ground, known mining history, or unusually poor bearing capacity, may still need a specialist intrusive investigation beyond what’s typical for a domestic rear extension, and that stays a separate instruction where the ground genuinely warrants it. For most rear extension projects, though, coordinating the desk study, engineer input, and Building Control submission through one team removes a real source of delay. Start with a quote or read how the process works before you commit to a design.
Where to check the standards and guidance yourself
- British Geological Survey for local drift maps and regional geology data used in desk studies.
- BS EN 1997 (Eurocode 7) and BS 5930 for the technical standards governing geotechnical design and site investigation practice.
- UKAS for verifying laboratory accreditation on any report you’re handed.
- BRE SD1 for sulphate classification and concrete durability guidance.
- Building Regulations Approved Document A and NHBC Chapter 4.2 for foundation depth minima and tree-influence calculations.
Sources
- Soil testing — Impact Geotechnical
- Phase 1 desk studies — EMS Geotech
- Why your new house needs deeper foundations than you’d expect — The Beam Doctor
- Geotechnical survey for residential extension — The Testing Lab (2026)
FAQ
How much does it cost to get a soil sample tested?
Per-sample laboratory testing for plasticity index, sulphate, or pH is charged individually, and the total depends entirely on how many samples your engineer specifies. A single trial pit programme with a handful of samples costs considerably less than a full intrusive programme with chemical suites and groundwater monitoring.
How much does a soil investigation cost?
Costs range from a modest Phase 1 desk study up to a much larger sum for a comprehensive intrusive programme with boreholes and extensive lab testing. Site access, sample depth, and the number of chemical tests requested all push the final figure up or down.
Can I test my soil myself?
You can get a rough idea of soil type with a simple jar test or a home pH kit, but this won’t satisfy Building Control or a structural engineer designing your foundations. Anything feeding into a foundation design needs UKAS-accredited laboratory results and a report that references BS EN 1997 and BS 5930.
What time of year is best for soil testing?
Ground investigation can technically happen year round, but drier months make trial pit excavation and access easier, and give a clearer read on natural moisture conditions rather than a garden waterlogged after weeks of rain. Winter investigations are still valid; they just sometimes take longer on site.
Do I need a soil test if I’m using The Extension Works?
This company coordinates the desk study and any structural-engineer-scoped ground investigation as part of an in-house design and build process, with results feeding directly into the structural calculations and Building Control submission. Pricing for the single-storey rear extension itself is available through an instant quote, with a £499 one-off booking fee to secure your project slot.